Button actions allow you to use a button to perform a function.
Available Button Actions
Add Message to Display
Inserts text from the button’s Message box in the Speech Display Bar (SDB). The words are not spoken.
Add Time/Date
Displays the current date and time in the SDB.
AI: Modify Speech Display Bar
Displays two AI options:
AI Message Edit uses AI to edit the grammar, punctuation, or spelling of the text in the SDB.
AI Translate uses AI to translate the SDB text into the language you choose.
Backspace Key
Deletes the last character in the SDB.
Battery Status
Displays the current battery status in the SDB.
Calculator
Opens a pop-up window with a functioning calculator.
Cancel Visit
Clears all remaining Visits. You remain on the current page. If Cancel Visit and Navigate are on the same button, they will remove any visit counters (see Tech Notes).
Center Head Tracking
Centers the cursor in respect to the user’s current head position.
Character Prediction
Sets the prediction order for character prediction buttons on a keyboard page. Select Character Prediction to open the Prediction Order list. The number you select will determine how likely the character currently displayed in the SDB is to be displayed on the button. Options range from Number 1 (the most likely) to Number 10 (the least likely).
Clear Display
Clears the text from the SDB.
Clear Last Word
Deletes the last word from the SDB.
Cursor Mode
Changes the cursor movement mode: Cycle, Character, Word, or Sentence.
If you select Cycle, pressing the button toggles among Character, Word, and Sentence modes. Each time you select the button, the button label changes according to the current mode (even if you created your own button label).
If you select Character, pressing the button moves the cursor left or right by one character. If you select Word, pressing the button moves the cursor left or right by one word. If you select Sentence, pressing the button moves the cursor left or right by one sentence.
Data Logging On/Off
Toggles data logging on and off. Data logging allows your device to collect language usage data that you can upload to the Realize Language website for web-based analysis.
Go to Vocabulary
Set up a button to open a customized vocabulary file.
Grammar Action
Changes the existing word to the chosen grammatical form.
Help Signal
Triggers a loud attention-getting sound.
Jump to Page
Jump to Page takes you to a new page for a single selection and then takes you back, ignoring any unused visits.
Jump to Page functions like Navigate when the visit counter (see Tech Notes) is greater than zero.
Jump to Page functions like Visit when the visit counter is zero.
On the first button selection, Jump to Page or Visit do the same thing.
On the second button selection, Jump to Page acts like Navigate.
Move Cursor
Moves the cursor in the SDB left, right, up, or down. If you select left or right, pressing the button will move the cursor left or right by one character, word, or sentence within a line in the SDB. If you select up or down, pressing the button will move the cursor up or down by one line in the SDB.
Navigate
Takes you to a pre-defined page and leaves you there until you select another button or return to your previous page or the home page. Navigate also adds the current page into the page queue (see Tech Notes), if no Visits are active.
Navigate Back
Takes you back to the previous page(s) in the page queue (see Tech Notes) in sequence.
Navigate to Home
Navigate to Home takes you to the home page of the vocabulary file. It clears the page queue and visit counter (see Tech Notes).
Open App
Opens a specific iPad® app from a vocabulary page. This action is not available on a dedicated device.
Open Website
Takes you directly to the website linked to the button. When you select Open Website, you will be prompted to enter the website’s URL. When Restricted View is turned on, the user cannot go beyond the first page of the website.
Pause/Resume Speech
Pauses any speech that is currently playing—for example, a speech message or a recorded speech. Activating this action again will resume the paused speech.
Pause/Resume Tracking
Pauses or resumes head tracking. Create a Pause/Resume button if you want a larger area to access than the smaller “Pause” and “Resume” options that appear on the navigation bar. When tracking is paused, the button turns red.
Place Cursor
Inserts the cursor in the SDB. The SDB and the button will also change to Cyan (a greenish-blue color) to indicate Place Cursor mode. When you enter additional text, the SDB will exit Place Cursor mode. To exit Place Cursor mode without entering additional text, simply select the button.
If the cursor is inserted at the end of the SDB, it will not appear if "Visible Cursor" is turned off in Settings > Speech Display Bar.
If “Allow Place Cursor” is turned on in Settings > Speech Display Bar, Place Cursor will appear as an option in the SDB context menu, allowing you to press and hold on the SDB to place the cursor without setting up a Place Cursor button.
Play Library Audio
Plays an audio file from the user’s media library. This action is not available on a dedicated device.
Play Recorded Speech
Plays recordings of someone speaking.
Play Video
Plays a video file or YouTube video file. The file must be stored on the device. Add the Play Video action to a vocabulary button and tap the button whenever you want to play the video.
Record Speech
Records someone speaking.
Repeat Last Spoken
Repeats the last spoken message.
Select Profile
Changes Settings to match the saved set of settings, saved as a profile.
Speak
Pronounces the text in the SDB.
Speak Label Only
Speaks the button label, but does not display it in the SDB.
Speak Last Sentence
Speaks only the last sentence in the SDB.
Speak Last Word
Speaks only the last word in the SDB.
Speak Message Only
Speaks the button message, but does not display it in the SDB
Speech Message
Speaks the button message and displays it in the SDB.
Stop Library Audio
Stops audio and video files from the user’s library. This action is not available on a dedicated device.
Stop Scan
Stops a scan that is in progress.
Stop Speech
Stops the speech file currently playing.
Store Text to Button
Stores text currently displayed in the SDB to the button you select.
System Keyboard
Opens the iPad keyboard.
Take a Photo
Activates the device camera so you can take pictures that will appear on a button and will also be saved with other images on the device.
Text Copy
Copies the text in the SDB to the system clipboard. The copied text can then be pasted into other apps. This action is not available on a dedicated device.
Text Paste
Pastes the text from the system clipboard into the SDB. This allows text from other apps to be pasted into the app. This action is not available on a dedicated device.
Text Share
Shares the text in the SDB using email, SMS text, the social network services Facebook and Twitter, or the blogging service Tumblr. This action is not available on a dedicated device.
Texting - Navigate to Conversations
Allows to you add a texting button to a customized vocabulary. Use the button to open your texting app.
Toggle Mute/Unmute
If the device is currently speaking a long message, selecting this button will not stop the speech but stop the speech from being spoken aloud. Selecting the same button again lets the text be heard.
Visit
Takes you temporarily to a predefined page for a single selection and then automatically goes back to the previous page.
Visit mode records the pages and their sequence of loading. Termination of Visit mode is caused by activation of a different type of button and returns you to the initial page.
Visit always adds to the page queue and uses the visit counter (see Tech Notes).
Once a non-navigate or navigate back button is selected and visit counter is greater than zero, you will go back one step.
If Visit is active, Navigate ignores the page queue. For example, starting at the home page, Visit page A, Navigate to page B, and then select a non-navigation button. You will return to the home page.
Visit Exception
If you have one button on a Visit page that you don’t want to return to the previous page, use a Visit Exception action to leave it on the page for one additional hit.
Volume Down
Turns the volume down.
Volume Up
Turns the volume up.
Whiteboard
Turns a button into a free-format drawing surface. Select the pen color and width, erase or undo while drawing, and load drawings and save them by name.
Word Finder
Finds the path to a word you are looking for. This action opens a Word Finder window. Enter a word and select Find. One or more paths to the word are displayed. Select a path and follow it to the word.
Word Prediction
Sets the prediction order for word prediction buttons on a keyboard page. Select Word Prediction to open the Prediction Order list. The number you select will determine how likely the word currently displayed in the SDB is to be displayed on the button. Options range from Number 1 (the most likely) to Number 10 (the least likely).
Tech Notes:
Behind the scenes in the app,
the page queue (page history) builds up as you open vocabulary pages leading up to your current location.
the visit counter counts the number of times you select a Visit action without selecting another navigation action. The counter influences how Jump to Page and non-navigation buttons work.
Add or Change a Button Action
To add a button action:
Select Menu and Edit Page.
Select the button you want to modify and select Edit This Button.
Scroll down to the Button Actions section and select Add.
Scroll through the list of actions and tap the action you want. It will be added below the existing action for the button.
Select Save and Done.
To change a button action:
Select Menu and Edit Page.
Select the button you want to modify and select Edit This Button.
Scroll down to the Button Actions section.
Select the existing action. The list of available actions will be displayed, with the existing action selected.
Select the new action you want. The new action will replace the old action under Button Actions.
Select Save and Done.
Rearrange or Remove Button Actions
Select Menu and Edit Page.
Select the button you want to modify and select Edit This Button.
Scroll down to the Button Actions section.
Select Edit. A red
 icon will appear in front of each action linked to the button.
 To remove an action, select the red
 icon and then select Delete. To rearrange the order of the actions, tap and hold the gray bars
  to the right of an action and drag the action into the correct position.
Select Done.
Select Save and Done.
Create a Button to Store Message Text
Go to the page that includes the button on which you want to store text.
Select Menu and select Edit Page.
Tap the button on which you want to store text.
Select Edit This Button.
Name the button, and optionally create a message and modify the style.
Scroll to the Button Actions section and select Add.
Scroll through the list of actions and select Store Text to Button. The action will be displayed in the Button Actions section.
Select Save. Select Done to exit edit mode.
Note: Once a sentence or phrase has been constructed, it can now be saved on a button by navigating to the location of the Store Text button that you created. Tap the button, tap Continue, and tap the button in which you want to store the text, and then tap Okay. The text will appear in the button you selected, and each time you tap that button it will speak that saved text.
Create a Button to Take a Photo
This feature provides an alternative so you don’t need to be in edit mode to add a picture to a button. You can create a button that allows you to take a picture that will be imported to the button automatically every time you tap the button. The picture will also be added to your library of imported images.
To set up the button action:
Go to the page with the button location you want.
Select Menu and Edit Page.
Select the button you want to use.
Select Edit This Button.
Add a label and message.
Scroll down to Button Actions and select Add to open the list of actions.
Select Take a Photo.
The Take a Photo action will be added to the button’s actions.
Select Save. Select Done to exit edit mode.
To take a photo for your button:
Select the new button to activate the camera.
Select the camera button.
Tap Use Photo.
The photo will appear as the image on the button.
Note: Each time you press the button, a new image from the camera will replace the existing image on the button. If the old image on the button was imported and not used elsewhere, it will be deleted. An image will appear on the button until you press the button again.
To delete photos:
To delete photos, you must connect your device to your computer and remove the photos using Explorer from the computer.
Create a Button to Play a Video
In Unity AAC, display the page that has the button you want to use to play the video.
Select Menu and Edit Page.
Select the button you want to use and select Edit This Button.
Give the button a label and scroll down to the Button Actions section.
Select the existing action to open the Select Action list.
Select the action Play Video. The Video Type window will display two options—Library Video and YouTube Video.
Select Library Video. A list of available videos will open with Videos selected above the list.
If the video was originally recorded on your device, leave Videos selected
If the video was originally imported through the cloud, select Albums.
Scroll or search through the list.
Select the video you want. The video will appear in the Choose Video window.
Select Use. When the video finishes compressing, Play Video will be displayed under Button Actions.
Select Save. The label you entered will be displayed on the button.
Select Done. When you select the button, the video will play.
Create a Button to Play a YouTube™ Video
Note: You must have an active Wi-Fi connection.
On your device, select the YouTube video you want.
Select the Share icon
 and then select the Copy Link icon
  . A “Copied” message should appear.
In Unity AAC, display the page that has the button you want to use to play the YouTube video.
Select Menu and Edit Page.
Select the button you want to use and select Edit This Button.
Give the button a label and scroll down to the Button Actions section.
Select the existing action to open the Select Action list.
Select the action Play Video. The Video Type window will display two options—Library Video and YouTube Video.
Select YouTube Video. The YouTube window will display a Video Link field.
Press and hold on the Video Link field. A small Paste prompt will appear.
Select Paste. The link you copied will be pasted into the field.
Select Done. Play Video will be displayed under Button Actions.
Select Save. The label you entered will be displayed on the button.
Select Done. When you select the button, the YouTube video should play.
Note: If you do not have a Wi-Fi connection when you attempt to play the YouTube video, the display area will be black and the following message will appear:
“No Connection to YouTube
An internet connection is required to play a YouTube video.”
If there is an internet connection but YouTube cannot be reached, the following message will appear:
“No Connection to YouTube
YouTube appears to be blocked by your internet service provider. Please contact your network administrator.”
Create a Button to Open an App
Note: This feature is not available in dedicated systems.
Go to the page that has the button you want to use.
Select Menu and Edit Page.
Select and hold the button you want to modify.
Select Edit This Button.
Give the button a label and scroll down to the Button Actions section.
Select Add. A list of available actions opens.
Select the action Open App. The Select Category list opens.
Scroll through the list or search for the category you want.
To search for the app:
Select the search
 icon on the right side of the Select Category title bar or drag down on the list. A keyboard will open.
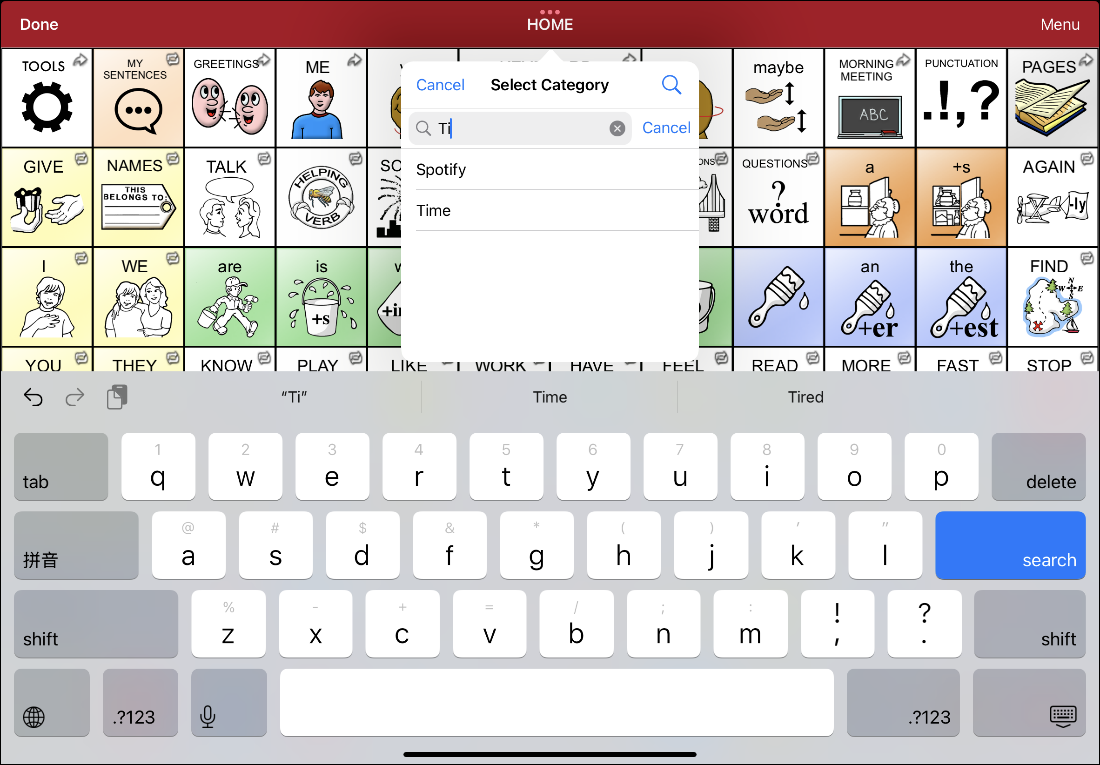
Enter a category name or partial name. A list of matching names will open.
Note: The search function searches for matches anywhere in a name.
Select the category and app you want and select Save.
Note: Make sure the app you select is installed on your device.
Exit edit mode and select the button. The app should open.
Note: If the app requires a login, be sure you have the login information available.
To exit the app and return to device, select “Unity” in the upper left corner of the screen.

Create a Calculator Button
When on the keyboard or numbers page, select Menu and Edit Page.
Select an empty button and select Edit This Button.
Type the Button Label you want; delete the Button Message; and choose the icon you want.
Scroll down to Button Actions and select Edit and delete Speech Message as the button action.
Select Add; then select Calculator.
Select Save.
Create a Volume Control Button
⚠️ Excessive volume or sound pressure level when using earphones or headphones can cause hearing loss over extended periods of time.
You can add volume controls to buttons within vocabulary pages.
Go to the page on which you want to create the button.
Select Menu and Edit Page.
Select and hold the button you want to use. A list of button options appears.
Select Edit This Button.
Add a button label and icon.
Under Button Actions, select Add. A list of actions appears.
Select either Volume Up or Volume Down.
Select Save. Select Done to exit edit mode.
Create a Battery Status Button
You can create a button that displays the battery status of both the device and the amplifier in the Speech Display Bar.
Go to the page on which you want to create the button.
Select Menu and Edit Page.
Press and hold on the button you want to use. A list of button options appears.
Select Edit This Button.
Add a button label and icon.
Under Button Actions, select Add. A list of actions appears.
Select Battery Status.
Select Save. Select Done to exit edit mode.
Create a Date/Time Button
You can create a button that will show the date, time, or both in the Speech Display Bar.
Go to the page on which you want to create the button.
In Unity AAC, select Menu and Edit Page.
Select and hold on the button you want to use. A list of button options appears.
Select Edit This Button.
Add a button label and icon.
Under Button Actions, select Add. A list of actions appears.
Select Add Time/Date.
Select one of the options: Date and Time, Date Only, or Time Only.
Select Save. Select Done to exit edit mode.
Create a Button to Open a Customized Vocabulary File
Go to the page that includes the button you want to use.
Select Menu and Edit Page.
Select Edit this Button.
Add a button label and icon.
Under Button Actions, select Add.
Select Go to Vocabulary.
Select the customized vocabulary file you want the button to open.
Select Save. Select Done.
Tip: You could use this procedure to create a bilingual vocabulary. For example, in a Spanish vocabulary, set the Go to Vocabulary action to go to an English vocabulary. Then set up a button in the same position in the English vocabulary to go to the Spanish vocabulary. This would allow you to quickly toggle back and forth between languages.
Create a Button to Link to a New Page
Go to the page that includes the button that you want to link to a page.
Select Menu and Edit Page.
Select the button to be linked to the new page.
If the button is blank, select Create New Button. Otherwise, select Edit This Button.
Enter the label and message (optional).
Scroll to the Button Actions section, select Add, and select a navigation action for the button from the drop-down list.
Navigate and Visit list pages to link to.
Additional actions include Jump to Page, Navigate Back, Navigate to Home, Visit Exception, and Cancel Visit.
For descriptions of how these button actions function, see Available Button Actions.
Note: If there was a previous action on this button, select Edit, select the red
 icon, select Delete, and select Done.
 Note: If you choose Navigate Back or Navigate to Home, skip the next step.
Choose the page to navigate to from the listing. If the page does not already exist, select + to add a new page to link the button to. Select No Animation.
Select Save. Select Done to exit edit mode.