Quick Access Buttons
The quick access buttons on the front of the device can perform a variety of software functions assignable by the user from the Quick Menu. They can be accessed with alternate access methods, such as head tracking and eye tracking. These buttons create convenient shortcuts to save time and improve productivity as well as to make some harder-to-reach functions more accessible. They also save space in the vocabulary area by moving functions off the page. Each button illuminates when dwelled on. This section provides information on assigning functions to these four hardware buttons.
Using touch access, head tracking, or eye tracking, select the Menu button to open the Quick Menu. Two buttons will appear in the multi-bar area.
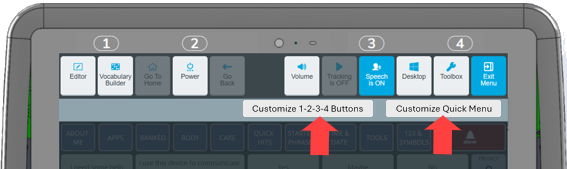
Customize Quick Menu
Add, remove, and rearrange Quick Menu shortcuts. For details, see “Quick Menu Shortcuts”.
Customize 1-2-3-4 Buttons
Slots numbered 1 , 2, 3, and 4 can be populated with an existing shortcut using the Quick Menu workflow. The default button functions are shown below.
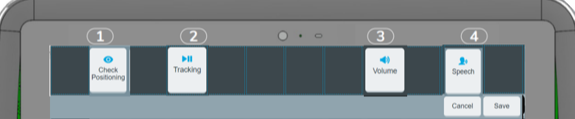
1 Check Positioning: This default function only works with eye tracking.
2 Pause/Unpause Tracking: This default function only works with head and eye tracking.
3 Volume: This default allows you to adjust device and BT/headphone volume.
4 Speech ON/OFF: This default allows you to toggle speech on or off. The functions you select will align with the device buttons.
When Empower is set to head tracking or eye tracking, you can dwell on a quick access button to activate it. The button will light up when you dwell on it. If the button does not have an assigned function, it will not light up.
Partner Display
The partner display is a small rear-facing screen on the back of the device that allows the communication partner to see the message the user is creating in the Empower software message window.
Use the partner display settings to adjust how you want the partner display to work. Go to Menu > Toolbox > Message Window & Multi-bar > Partner Display.

Partner Display
When this setting is ON, anything that appears in the message window will be sent to the partner display in real-time. A black preview box of the partner display will appear in the status area.
Select Message Window to Show Message on Partner Display
Turn this setting on when you want to compose your message privately before sending it.
When this setting is ON, text will be sent to the partner display only when the message window is selected.
When the setting is OFF (the default setting), text will be sent to the partner display as you enter it.
Scroll Rate
Adjust the rate at which lines of text will scroll in the partner display. Note: The slider settings range from .5 to 3 in .5 second increments.
Partner Display On/Off Button Action
To create a button in your vocabulary that turns the Partner Display ON/OFF, go to Menu > Editor > Edit > Select a button > Actions > Add Action > Message Functions. Select Partner Display On/Off. When ON, the toggle button turns blue and a black preview box of the partner display will appear in the multi-bar status area.
Notes:
If you have the Speak Display button action on a button and select that button, the content of the message will be sent to the message window.
When Privacy Mode is ON, dots replace text in the message window and partner display so you can hide what you are typing from others.
Front Speakers
The front speakers allow the user to have prompts or other audio directed toward themselves, rather than sending all audio to the back.
Destination Settings
To set what the device volume button will control and where the main and prompt voices will be played, go to Menu > Toolbox > System Settings > Sound Settings. Select the Destination tab.
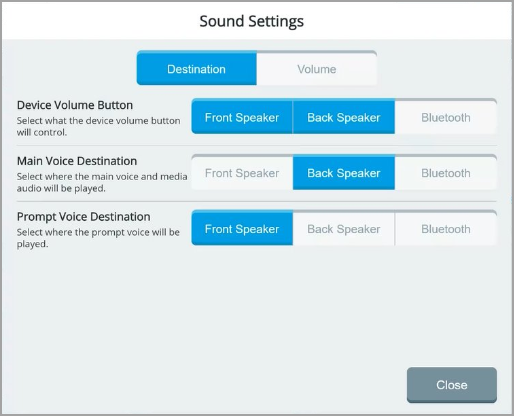
Device Volume Button
Select which speaker the device volume button on the frame of the device will control: Front Speaker, Back Speaker, or Bluetooth audio/headphones.
Main Voice Destination
Select where you want the main voice and media audio to be played from: Front Speaker, Back Speaker, or Bluetooth audio/headphones.
Prompt Voice Destination
Select where you want the prompt voice to be played from: Front Speaker, Back Speaker, or Bluetooth audio/headphones.
Volume Settings
To adjust the volume of the Front Speaker, Back Speaker, or Bluetooth audio/headphones, go to Menu > Toolbox > System Settings > Sound Settings. Select the Volume tab.
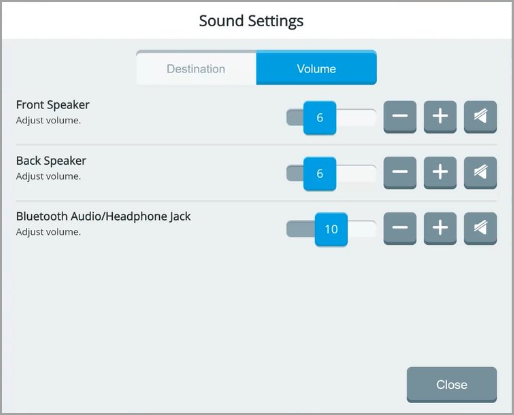
Front Speaker
Adjust the volume of the Front Speaker.
Back Speaker
Adjust the volume of the Back Speaker.
Bluetooth Audio/Headphone Jack
Adjust the volume of the Bluetooth Audio/Headphone Jack.
Auto-Brightness Settings
When Auto-Brightness is ON, screen brightness will automatically adjust to the amount of light in the environment. To turn auto-brightness on or off, go to Menu > Toolbox > System Settings > Power Settings > Battery Saving. Turn Auto-Brightness ON/OFF. The default setting is OFF.