Note: Eye tracking will only appear as an option if eye tracking is built into the device.
Eye tracking allows you to use eye movements to make selections on the screen. Once you select eye tracking as the access method, eye tracking is active and all settings for that user take effect immediately.
Starting Eye Tracking in NuVoice
Typically, a communication partner helps during the setup process. While selecting menu options the communication partner can touch the buttons with a finger.
Select the Tools button
 to the right of the text display area. The Tools menu will slide out from the left side of the screen.
Select the Toolbox button
 from the Tools menu. The Toolbox will open.
From the Toolbox select Access Method Menu. The Access Method Menu will open.
Select Choose Different Access Method and then Eyegaze.
“Current Access Method: Eyegaze” will be displayed to the right of Choose Different Access Method and the Track Status box will be displayed in the Status area.
When the Track Status box is green, eye tracking is active. When the Track Status box is red, eye tracking is paused. To change the status, simply select the Track Status box to change the color.
Note: During setup, it is best to pause eye tracking until you are ready to calibrate.
Using the Track Status Box
When Track Status is set to On in the Eyegaze Access Method Menu, the Track Status box appears. The Track Status box provides positioning feedback. The options below the box allow you to view more detailed feedback.
Track Status Box (eye tracking unpaused)
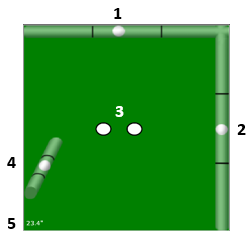
1 Horizontal positioning marker
2 Vertical positioning marker
3 Eye tracking positioning markers
4 Distance marker: Graphical representation
5 Distance marker: Numerical representation
Track Status Box (eye tracking paused)
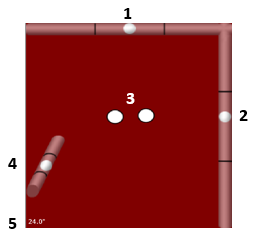
1 Horizontal positioning marker
2 Vertical positioning marker
3 Eye tracking positioning markers
4 Distance marker: Graphical representation
5 Distance marker: Numerical representation
Eye Tracking Positioning Markers
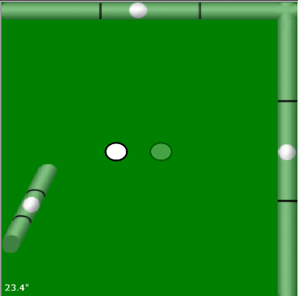
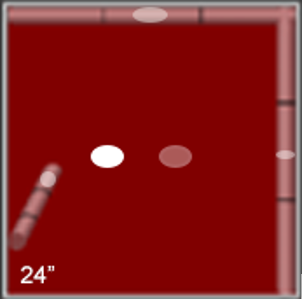
The two white oval eye tracking positioning markers track the user’s basic position relative to the display. When positioning is correct, the eyes are level and both markers are white. When one of the markers is white and the other is faded, the user’s head is turned at an angle so that the eyes are not equidistant from the display. Reposition the user or device until both markers are white.
Positioning Markers (eye tracking unpaused)
Positioning markers (eye tracking paused)
Horizontal and Vertical Positioning Markers
When Tracking Status Graphics is turned on, horizontal and vertical positioning are correct when the white dots are positioned in the center of the top and right sides of the box. When the positioning is off, reposition the user or device gradually until the markers are centered on their respective sides.
When Tracking Status Graphics is turned off, the horizontal and vertical positioning markers are not visible.
Distance Markers
When Tracking Status Graphics is turned on, the Track Status box shows the distance the user’s eyes are from the display. The distance is displayed in small numbers in the bottom left corner of the box and displayed graphically by a segmented bar. The distance must be between 18 and 30 inches. When the dot is positioned toward the top of the bar, the user is near the minimum distance. When the dot is positioned toward the bottom of the bar, the user is near the maximum distance. When the optimal distance is attained, the dot will be at or near the center of the bar.
When Tracking Status Graphics is turned off, the distance markers are not visible.
Adjusting Positioning
The Eyegaze Positioning screen displays the position of the eyes so that the device can be positioned correctly.
From the Access Method Menu, select Eyegaze Positioning. The screen will show what the eye tracking system sees.
When eye tracking is active, the Track Status box is green. To pause eye tracking, touch the Track Status box. The box turns red. To resume using eye tracking, touch the box again.
The Tracking Status Graphics setting turns the Track Status box graphics on and off. When Tracking Status Graphics is turned on, two small white ovals show the positioning of the user’s eyes and positioning dots appear on the outer edges of the Track Status box to indicate correct or incorrect positioning. These dots assist in correcting the positioning. When Tracking Status Graphics is turned off, only the two small ovals appear.
When necessary, reposition the user’s head slightly until you see two solid white ovals in the Track Status box.
The goal of making these adjustments is to see both white dots (pupil markers) stable and centered as much as possible in the Track Status box.
When the positioning is correct, select the OK button in the bottom right of the display to exit the menu.
Tip: When you want to pause eye tracking but still be able to make menu selections with a finger, touch the Track Status box or select the Pause/Resume button on the Access Method Menu. Touch the box or select Pause/Resume again to resume using eye tracking. Touch the display to make selections.
Correct Positioning
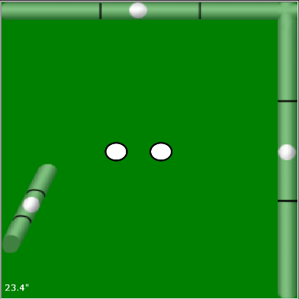
When positioning is correct, the device and the user’s face will be on the same plane—basically parallel to each other. The track box will always show two white circles next to each other near the center of the box. The user’s eyes will be within 22 inches to 26 inches of the screen.
Correct Positioning (eye tracking unpaused)
Eyes are level and gaze is in the middle-to-upper part of the display.
Correct Positioning (eye tracking paused)
Eyes are level and gaze is in the middle-to-upper part of the display.
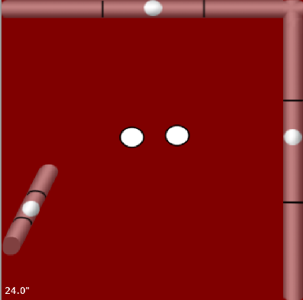
With correct positioning, the nose should be pointed at the vertical middle of the display and the eyes should be looking in the middle to the top two-thirds of the display. To achieve correct positioning, you may need to move your device, the user, or both until the user is comfortable and the white ovals line up in the track box.
Calibrating the Eye Tracking System
Calibration is the process by which the eye tracking system adjusts to the eyes of the person using the system. It helps determine where the user is looking on the screen. The more accurate the calibration, the smaller the target the user can look at and select.
Calibrating for the First Time
This section explains how to set up an initial calibration using the default calibration settings. The next section explains how to fine-tune the calibration if the user has a difficult time working with the default calibration settings.
Touch Pause in top right of the screen.
With eye tracking paused, display the Toolbox and select Access Method Menu.
Check the alignment in the eye positioning menu.
Have the user focus on the center of each stimulus point as it appears until the next point appears automatically.
When the calibration of all five points is complete, “Calibration Complete” will appear with the calibration results. The results show the stimulus points in green for the left eye and blue for the right eye.
Select OK to close the box and select OK to close the Access Method Menu and return to the Toolbox.
Select Go To Home the Toolbox to go to your Core or Home page and have the user begin practicing with eye tracking.
If you need to recalibrate, pause eye tracking, return to the Access Method Menu, select Customize Eyegaze Settings, and then select Calibration Settings.
Adjusting Calibration Settings
Calibration settings can be changed to improve the user experience.
Recommendation: When initially setting up eye tracking, adjustments are commonly made to the stimulus type and number of calibration points. If visual attention is poor, try using a 0, 1, or 2-point calibration.
Be sure to take breaks to avoid fatiguing the user or losing his or her attention.
From the Access Method Menu, select Customize Eyegaze Settings and then select Calibration Settings. Most of the menu options use the arrow buttons to adjust the settings up or down. Adjust the color options by selecting the option and then selecting a color.
Adjust the settings to the user’s needs.
When you finish adjusting settings, select OK.
Select Calibrate Now. When the calibration is complete, select OK to exit.
Using Calibration Menu Settings
This section briefly explains how to use each Calibration Menu setting.
Stimulus Type
A stimulus is the item the user’s eyes focus on as it moves around the display during calibration. Select the stimulus you want to use:
Point – a solid colored dot

Point 2 – a solid colored dot with the inverted color in the center

Cross – a small cross

Image – a selectable image; use the Change Image button to select an image
Stimulus Size
Increase or decrease the size of the point, cross, or image. The default is 30. Available sizes range from 10 to 400. For the best calibration results you want the stimulus to be as small as the user’s eyes can easily follow. The smaller the stimulus, the more accurate the calibration.
Active Eye
Select which of the user’s eyes will be recognized during the calibration process.
If both of the user’s eyes work normally, select Both.
If one eye is completely obstructed, select Right or Left.
Stimulus Speed
Change the speed at which the stimulus will move around the display during calibration. Fast is the default. Available speeds are Very Fast, Fast, Medium, Slow, and Very Slow.
Stimulus Sound
Select a sound to play when a calibration point is completed. Once a sound plays, the stimulus will move to the next location. Standard Beep is the default. You can also select other sounds that will be previewed when you select them. If you do not want a stimulus sound, select No.
Keyboard Step-through
If the user loses attention during the calibration process, keyboard Step-through allows you to control when the stimulus advances to the next calibration point.
Plug in a USB keyboard and use the keyboard’s spacebar to step through the calibration.
If you select Use Spacebar For First Point the system will wait for you to manually start the calibration process by pressing the keyboard’s spacebar, then it will proceed automatically through the calibration points.
If you select Use Spacebar you will need to manually calibrate each point by pressing the spacebar when the user is attending to the screen.
If you select the default setting of No, calibration will proceed automatically through the calibration points.
Calibration Points
Calibration Points determines the number of stimulus points used during calibration. The available settings are 0, 2, 5, 7, and 9; the default is 5. Selecting more points for the user to follow will improve accuracy over a larger area of the screen.
Calibration Area
Calibration Area determines the percentage of the screen that is calibrated for use. At the default calibration area (100%), some of the calibration points will be at the very edges of the screen and may be difficult for the user to see or focus on.
Select Background Color
Use a color that best matches the background color of the vocabulary or NuVoice.
Select Pointer Color
Change the calibration stimulus color for point, point2, and cross. Options are available to create, preview, and save custom colors.
Eyegaze Calibration
If you want the calibration to apply to the current user area only, select Per User Area. If multiple users will use the same device, Per User Area will allow you to create a separate calibration for each user. If you want your calibration to be used in all six user areas, select Global.
Configuring a Selection Method
Before you start using eye tracking to communicate, you need to configure a selection type. To get started, select Customize Eyegaze Settings from the Eyegaze Access Method Menu. Change most of the menu options by selecting the option and then adjusting the settings. The remaining menu options use the arrow buttons to adjust the settings up or down.
Choosing the Selection Type
The Selection Type settings allow you to configure the selection method as Auto, Blink, or Switch. Use the Selection Type arrow buttons to choose the selection method that will work best for the user.
Selection Type: Auto
Auto is the default setting. When Auto is selected, a button is selected automatically when the user looks at it. Dwell Time is displayed as a supporting option. Use the Dwell Time arrow buttons to adjust the setting to the user’s needs.
Dwell Time is the amount of time the eyes must focus on a button for the system to recognize a selection. The default dwell time is .80 seconds. At this setting, when the user focuses on a button for 0.8 seconds, the system selects that button automatically.
Selection Type: Blink
When you select Blink, the user can blink to make a selection. Minimum Blink Duration and Maximum Blink Duration are displayed as supporting options. Use the Duration arrow buttons to adjust the settings to the user’s needs. The system will ignore blinks that are of shorter or longer duration than your settings.
Minimum Blink Duration is the minimum amount of time the user’s eyes must be closed during a blink for the system to recognize a selection. The default minimum setting is .30. We suggest you try using the default before changing the setting. If you need to change the setting, the minimum duration should be long enough that the user’s normal blinks do not activate a button.
Maximum Blink Duration is the maximum amount of time the eyes must be closed during a blink for the system to recognize a selection. The default maximum setting is .80. We suggest you try using the default before changing the setting. If you need to change the setting, the maximum duration should be long enough that the user finishes a blink before the maximum time has accumulated. You do not want to make your maximum duration time so long that if the user’s head turns away from the screen and then back again, the system sees that as a selection.
Selection Type: Switch
Switch allows you plug in and use a switch to make selections. The user uses his or her eyes to move the cursor and the switch to make selections. To use this method, the user must be able to maintain his or her focus on a target and activate a switch at the same time.
When you select Switch, “Acceptance Time” is displayed as a supporting option. Use the Acceptance Time arrow buttons to adjust the setting to the user’s needs. Acceptance time is the amount of time the user must hold down the switch before the system recognizes a selection. The default setting is .01. Because this method has no time requirement for focusing on the target, the user can look at the target for as long as he or she wants and activate the switch when ready to make a selection.
Trying Out Your Settings
Once you choose a selection method and configure the supporting option(s), do the following:
Select OK to close the Customize Eyegaze Settings Menu.
Select OK again to return to the Toolbox.
Select Go To Home to go to your Core or Home page.
Have the user try out your settings.
If necessary, return to the Access Method Menu and fine-tune your settings.
Recommendation: While the user is getting used to eye tracking, take frequent breaks to rest the user’s eyes and relax his or her concentration.
Pausing Eye Tracking
You can use a variety of methods to stop and re-start eye tracking while you make adjustments to the settings or if you need to look longer at a screen or menu. Touch the screen to activate buttons when eye tracking is paused. When eye tracking is paused, the Track Status box is red. When eye tracking is active, the Track Status box is green.
Use any of the following methods to pause eye tracking.
Method 1 – Touch the Track Status Box
When Eye Track Status is turned on in the Access Method Menu, the Track Status box is visible. Touch the Track Status box to pause eye tracking. Touch it again to resume using eye tracking.
Method 2 – Eyegaze Access Method Menu
Use the Pause/Resume button in the Eyegaze Access Method Menu. Have the user gaze at (or press) the Pause/Resume option to set or release Pause.
Method 3 – Disable Pointer Insertable Tool
Assign the insertable tool Disable Pointer to a customized button. Press the button to set Pause. Press it again to set Resume. To do this:
Be looking at the button where you want to store the Disable Pointer tool.
Select the Tools button.
Select the Setup button.
Select the button you want to use.
Select Spell Message or Define button Function.
Select Insert Tool.
Select Spell Tool to Find or select Access Method Tools.
Select Disable Pointer.
Select OK two times.
Method 4 – Front Panel of Device Case
Have the user gaze directly at “Pause” on the front panel of the device case until Pause or Resume is selected.
Changing Pointer Settings
To change pointer settings, open the Eyegaze Access Method Menu, select Customize Eyegaze Settings, and select Pointer Settings. For most of the menu options, use the arrow buttons to adjust the settings up or down. Change the remaining menu options by selecting the option and then adjusting the settings.
Highlight, Outline, and Fill Settings
Highlight Keys
When Highlight Keys is set to On, the Highlight Settings button is active and each button the cursor moves to is highlighted according to those settings.
Highlight Settings
Use the highlight settings to configure a colored outline or colored fill for button highlighting. When you select Highlight Settings, the Highlight Settings Menu displays the options Highlight Style, Outline width, Outline Color, and Fill Color. It also provides a preview of how a button will look with a particular style of highlight applied to it.
Highlight Style
Highlight Style allows you to select the style of visual feedback applied to a button. Use the arrow buttons to choose one of the available selections: Outline, Invert, Outline and Invert, Fill, or Outline and Fill.

When Outline is selected, the button is outlined in the selected Outline Color and width of the selected Outline Width. Fill Color is not available when this option is selected.

When Invert is selected, the button’s colors are inverted. For example, white appears as black. Outline Color and Fill Color are not available when this option is selected.

When Outline and Invert is selected, the button is outlined in the selected Outline Color and width of the selected Outline Width and is also inverted. Fill Color is not available when this option is selected.

When Fill is selected, the button is filled with the selected Fill Color. Outline Color is not available when this option is selected.

When Outline and Fill is selected, the button is outlined in the selected Outline Color and width of the selected Outline With and is also filled with the selected Fill Color.
Outline Width
Outline Width allows you to select the thickness of the outline when you select one of the outline options. Use the arrow buttons to choose one of the available selections: Very Thin, Thin, Medium, Thick, or Very Thick.
Outline Color
Outline Color allows you to select the color of the outline when you select one of the outline options. Selecting the Outline Color button opens the Highlight Outline Color Menu. From the menu, select a color area in the large box and then use the color bar and arrows to the left of the box to “fine tune” the color. You can also adjust hue, saturation, and luminosity and save the color.
Fill Color
Fill Color allows you to select the color of the button fill when you select one of the fill options. Selecting the fill Color button opens the Highlight Fill Color Menu. From the menu, select a color area in the large box and then use the color bar and arrows to the left of the box to “fine tune” the color. You can also adjust hue, saturation, and luminosity and save the color.
Cursor Settings
Show Cursor
The cursor on your device is a hand. When the cursor is turned on, it follows your eye movements. The cursor shows you where you are, or where you are going, on your display screen. If you turn the cursor off, you will no longer see the hand.
Cursor Size
The Cursor Size option allows you to set the size of the cursor to Small, Medium, or Large.
Cursor Color
The Cursor Color option allows you to change the color of the cursor.
Pointer Settings
Pointer Color
The Pointer Color option allows you to change the color of the pointer.
Pointer Type
The pointer shows what particular object the user is focusing on.
When Circle or Square is selected and the user focuses on a button, a circle or a square appears over the key to show that’s where the user’s focus is. If the user dwells on the button long enough, it will be selected.
When Circle or Square is selected, additional options are available: Pointer Size, Pointer Mode, Pointer Border, and Pointer Transparency.
When None is selected, no pointer will be visible, and you will have no feedback to show where the user’s eyes are focused or what the user might be selecting on the screen.
Pointer Size
The Pointer Size option allows you to make the circle or square pointer larger or smaller.
Pointer Mode
When Animated is selected, the circle or square pointer will shrink in size while the button is being selected. It is an easy way to tell that the user has hit his or her target. If you select Static, the pointer maintains the same size while the button is selected. This setting only works with Dwell Selection.
Pointer Border
Selecting any Pointer Border value greater than 0 puts a darker border around the perimeter of the circle or square. Increase or decrease the value to adjust the thickness of the border.
Pointer Transparency
90% transparency means that the circle or square is almost clear. You can barely tell it is on a button. 0% means the pointer is completely opaque. You cannot see through it to read any text that might be on a button.
Changing Tracking Settings
The Tracking Settings help to adjust the smoothness of pointer/cursor movements. If you have set up the eye tracking system and are not satisfied with the smoothness of the pointer movements, try changing the settings using this option. Select Customize Eyegaze Settings and select Tracking Settings. Use the arrow buttons to adjust the Smoothing and Filter Method settings up or down.
Smoothing
The lower you set the smoothing number the faster the cursor or pointer will move. The higher you set the number, the slower the cursor or pointer will move. This helps to refine cursor and pointer movements. Selectable numbers range from 2 to 45.
Filter Method
The eye tracking system can determine the difference between saccades and fixations and apply separate methods to each type of eye behavior. Saccades are rapid, jerky movements of the eyes between fixation points over a short duration. Fixations refer to the eye resting on a point over a longer period of time. The available filtering methods are Stream, Snap, Group, Stream + Snap, and Stream + Group.
Stream works well for most users and at all ranges of smoothing. This setting moves with the eye wherever the user looks on the screen. Stream, applied to both eye movement and fixation, is the default filtering method.
Snap works well for users who have dramatic shifts in gaze (for example, poor visual attention, frequent and constant head movement, or severe nystagmus). Snap is very robust and makes the cursor feel “sticky”.
Group works well for users who have frequent shifts in gaze (for example, mild to moderate nystagmus) around a central point.
If none of these three filtering methods meets your needs, you can try one of the combination methods, Stream + Snap or Stream + Group. These separate the movements from the fixations and may benefit individuals who require filtering.
Changing Off-Screen Key Settings
These settings allow you to turn the off-screen keys on or off, set key sizes, and set key colors. To change off-screen key settings, open the Eyegaze Access Method Menu, select Customize Eyegaze Settings, and select Off-Screen Keys Settings. For most of the menu options, use the arrow keys to adjust the settings up or down. Change the key color options by selecting the option and then selecting a color.
Off-Screen Pause Key
When Off-Screen Pause Key is turned on, you can pause or resume tracking by gazing just above the top edge (middle) of the screen. “Paused” or “Active” will be displayed on the screen.
Off-Screen Pause Key Size
Sets the size of the off-screen Pause key. Use the arrow keys to select Thick, Medium, or Thin. You can also select Off.
Left Off-Screen Keys
When Off-Screen Tools Key is turned on, you can select the Tools key by gazing just beyond the left edge of the screen.
Left Off-Screen Key Size
Sets the size of the off-screen Tools key. Use the arrow keys to select Thick, Medium, or Thin. You can also select Off.
Left Off-Screen Key Color
Allows you to create a custom color for the off-screen Tools key. Select an area in the large color box to select a basic color and then use the other options to refine the color. The color bar and arrows to the left of the box adjust luminosity (brightness). The four arrows to the right of the color box move the cursor in the box in increments of five. Hue, Saturation, and Luminosity can be controlled through these four arrows or adjusted in increments of one with the arrows that come with each option. If you create a color that you want to save, select Save New Custom Color. Then select one of the Custom Color keys to store it under.
Right Off-Screen Keys
When Right Off-Screen Keys is turned on, you can access the off-screen keys by gazing just beyond the right edge of the screen.
Right Off-Screen Key Size
Sets the size of the right off-screen key. Use the arrow keys to select Thick, Medium, or Thin. You can also select Off.
Right Off-Screen Key Color
Allows you to create a custom color for the right off-screen key. Select an area in the large color box to select a basic color and then use the other options to refine the color. The color bar and arrows to the left of the box adjust luminosity (brightness). The four arrows to the right of the color box move the cursor in the box in increments of five. Hue, Saturation, and Luminosity can be controlled through these four arrows or adjusted in increments of one with the arrows that come with each option. If you create a color that you want to save, select Save New Custom Color. Then select one of the Custom Color keys to store it under.
Bottom Off-Screen Keys
When Bottom Off-Screen Keys is turned on, you can access the off-screen keys by gazing just beyond the bottom edge of the screen.
Bottom Off-Screen Key Size
Sets the size of the bottom off-screen key. Use the arrow keys to select Thick, Medium, or Thin. You can also select Off.
Bottom Off-Screen Key Color
Allows you to create a custom color for the bottom off-screen key. Select an area in the large color box to select a basic color and then use the other options to refine the color. The color bar and arrows to the left of the box adjust luminosity (brightness). The four arrows to the right of the color box move the cursor in the box in increments of five. Hue, Saturation, and Luminosity can be controlled through these four arrows or adjusted in increments of one with the arrows that come with each option. If you create a color that you want to save, select Save New Custom Color. Then select one of the Custom Color keys to store it under.
Working with Eyegaze Profiles
The Manage Eyegaze Profiles Menu allows you to save, load, or delete eyegaze profiles. This menu is especially helpful if you use the device with multiple individuals.
Selecting and Loading a Profile
The eye tracking system has several pre-defined profiles that you can choose from to help the user get started. These profiles contain eyegaze settings that have been selected to match the profile name. For example, if the user has never used an eye tracking system before, the Beginner profile might work the best. If the user has some experience using eye tracking, try Novice or Typical.
From the Eyegaze Access Method Menu, select Manage Eyegaze Profiles.
Select Load Eyegaze Profile.
Select the profile that best applies to the user.
A yellow box will ask if you want to copy these eyegaze settings to all areas.
If you select No, the settings will be copied only to the area you are currently using. For now, we suggest you select No.
If you select Yes, the settings will be copied to all user areas. You will also be asked if you want to set all areas to eyegaze access. If you select Yes, eyegaze access will be applied to all user areas.
Select OK to exit the Profiles Menu and return to the Access Method Menu.
Note: You can pause the eye tracking system by selecting the Access Method Menu’s Pause/Resume key. Select the key again to resume eye tracking. Touch the screen to make selections.
Managing Eyegaze Profiles
An eyegaze profile consists of a combination of the eyegaze settings you have selected from the Customize Eyegaze Settings Menu and the actual data from the calibration you performed. There are also several pre-defined profiles that you can select from when you first set up your eye tracking system. You can also create and save profiles of your own. To manage profiles, select Manage Eyegaze Profiles from the Eyegaze Access Method Menu.
Loading an Eyegaze Profile
Several pre-defined profiles are available. These contain eyegaze settings that have the best chance of working well for a beginner or advanced user. When you first set up your system, you may find it easier to select one of these profiles to use while the user is learning the system.
The Load Eyegaze Profile key allows you to load any of these pre-defined profiles or a profile that you created and saved to a USB flash drive. The flash drive must be plugged into your device in order to do this.
From the Eyegaze Access Method Menu, select Manage Eyegaze Profiles.
Select Load Eyegaze Profile.
Select the profile that best applies to the user. If the user has never used an eye tracking system before, select Beginner.
You will see a yellow box asking if you want to copy these eyegaze settings to all areas.
If you select No, the settings will be copied only to the area you are currently using. If the user is a beginner or novice, we suggest you select No.
If you select Yes, the settings will be copied to all user areas in the device. You will also be asked if you want to set all areas to eyegaze access. If you select Yes, you will be using eyegaze access in each area in the device.
Select OK to exit the Profiles menu and return to the Eyegaze Access Method Menu.
Saving Current Settings and Calibration to a Profile
This key allows you to save an eyegaze profile to the default Profiles location in your device or to a USB flash drive.
From the Eyegaze Access Method Menu, select Manage Eyegaze Profiles.
Select Save Current Settings and Calibration to a Profile.
After saving a profile, select Load Eyegaze Profile to load the profile into a user area at any time.
If you are working with multiple users using one device, you may want to save the eyegaze profiles of your users. Then you can simply load each user’s profile into a user area (or globally if that was selected as the Eyegaze Calibration option).
Important Information about Resetting to Factory Defaults
If you need to reset your device to the factory defaults (by selecting Reset to Factory Defaults from the Maintenance Menu) and you want to keep your calibration, you must save your eyegaze profile to a USB flash drive before you reset the device.
After resetting your device, select Load Eyegaze Profile to reload the profile. If you use profiles, it is a good idea to save them to a flash drive as a backup.
Deleting Eyegaze Profiles
Use the Delete Eyegaze Profile key to delete any profiles that you no longer use