![]()
Technical support questions: accentsupport@prc-saltillo.com
This guide applies to Empower® software version 1.12 or higher.
Power/Sleep Button
The power/sleep button is on the top of the device.
To turn on the device, press and hold power/sleep.
To wake/sleep the device, press power/sleep.
The device should be restarted weekly.
Recommended: Restart once per week; put to sleep daily. The device may wake up from sleep if using eye tracking or if Windows® updates are occurring. To preserve the charge overnight, either connect the charger or shut down the device completely.
To restart, select Menu > Power > Restart, and then select Yes.
If you don’t plan to use the device, want to store/transport it in a bag, or receive an error message, shut down the device completely. To do this, select Menu > Power > Shut Down, and then select Yes, shut down.
Menu
Select Menu to gain access to the Quick Menu. The Quick Menu contains links to the Editor, Vocabulary Builder, and the Toolbox. It will also give you access to the Windows® Desktop if the device is non-dedicated.
Select a Vocabulary
Go to Menu > Toolbox > Vocabulary > Select a Vocabulary.
Choose your desired vocabulary.
Note: Once you edit a button or create a Vocabulary Builder list, the vocabulary will be automatically saved and placed in My Vocabularies.
Vocabulary Settings
To change vocabulary settings, go to Menu > Toolbox > Vocabulary > Vocabulary Settings.
Rename a Vocabulary
From the Settings tab, edit the Vocabulary Name.
Change the Font and Size of Button Labels
From the Edit Fonts & Styles tab, select a Font and adjust the Size.
Set Button Preferences
From the Button Preferences tab, set the following:
Empty Button Appearance: What do you want empty buttons to look like? White, Transparent, Empty
Empty Button Action: What do you want empty buttons to do? No Action, Go To Home
Show Labels: Where do you want labels showing? Home, Middle, End
Use Alternative Symbols: Where do you want an alternate set of symbols to show? None, Middle, End, All
Button Padding: How much space do you want between the buttons? Set the percentage.
Set the Access Method
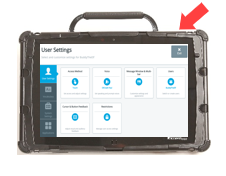
To set the access method, go to Menu > Toolbox > User Settings. Select Access Method and adjust the settings.
Change the Voice
Go to Menu > Toolbox > User Settings.
Select Voice.
Select the Main Voice or Prompt Voice tab. Then select Change Voice.
Edit a Pronunciation
“Teach” the device to pronounce a word correctly.
Go to Menu > Toolbox > User Settings.
Select Voice.
Select Edit a Pronunciation.
Enter the correct spelling of the word, then select Finished.
Enter the phonetic spelling of the word, then select Finished. To test the pronunciation, select the Play button. When satisfied, select Add.
Word Finder
Use Word Finder to locate a word in the vocabulary.
From the spelling keyboard:
Select Word Finder.
Type the word you want to find.
Select Search.
Select Guide Me.
If the word is not in Unity, it will say “no results found”.
Edit a Button
Go to Menu > Editor.
Navigate to where you can see the button you want to edit, then select Edit.
Select the button you want to edit.
Add or edit the Message and the Label. Suggested symbols will appear. If you do not see one you like or you would like to take a photo, select the Symbol tab. You can Search, Browse, or Import symbols or select Camera.
Additional button editing options:
Colors: Set various colors for the button.
Navigation: Add Navigation. Navigation options include things such as Go Back, Go To Home, and Go To Page.
Actions: Add an action. Action options include things such as Clear Display, Caps Lock, and Stop Speech.
Settings: Change button level settings. Settings include Message, Speech, Always Show Button Label, Alternate Pronunciations, and Alternate Prompt.
Select Finished, then Save.
Reset a Button to Factory Defaults
If you make a mistake, reset a button to factory defaults.
Go to Menu > Editor.
Select Edit and choose the button you want to reset.
Select the Settings tab. Select Reset Button.
Select Okay and then select Save.
Add a Verb to a MinSpeak Vocabulary
Note: This section applies to Unity/Unidad Sequenced or LAMP WFL Full vocabularies only.
Go to Menu > Editor.
Select the first icon for the word.
For example: Add the word “sip” (a present tense verb). The first icon for the word will be the Juice icon because we can take a sip of juice.
Select the second icon for the word.
Continuing with the previous example: The second icon will be the Mother icon because a mother can give her child a sip of juice.
Select Create a new link.
Select Page Settings, then Add Verb.
Enter “sip” in the first required text field. The software will auto-populate the other forms of the verb if they exist. If not, enter the other verb forms.
Select Finished. The software will automatically add all of the buttons for this verb. Select Save.
Make sure all buttons leading to this verb have the same style (color and label).
Create a Page with a Link
Go to Menu > Editor.
Navigate to the button where you want a page link, then select Edit. Select the button you want to edit.
Add a Label and a Symbol.
If desired, change the button color from the Colors tab.
Select the Navigation tab.
If the button already has navigation, select Remove Navigation. Select Go To Page.
Select an existing page or Add New.
Name your page and set the grid size.
Select Create.
Make sure Make Persistent is set to OFF.
Select Finished.
If you selected Add New, navigate to your new page and add the words you want. See Edit a Button.
Vocabulary Builder
Use Vocabulary Builder (VB) to temporarily limit the number of words appearing on the screen while keeping the motor plan for a word constant. For example, if you want to start with 8 words when first introducing the device to a child.
Go to Menu > Vocabulary Builder. Turn VB on by selecting the on/off toggle.
Decide if you want to start with all words hidden or shown. Select Hide All or Show All. Confirm your choice by selecting Okay.
There are two ways to create a VB list of words.
Type a list of words.
Select Edit List.
If desired, rename your list by selecting Change in the upper right-hand corner.
Select the text field and type a list of words you want to show/hide separated by commas. Select Finished and Okay.
Select Finished and Exit Menu.
Touch the symbols that lead to the word you want to show.
Touch the symbols that lead to the first word. Select the home button (top right) when you need to return to the home screen.
Continue to show/hide words in this way.
Select Exit Menu when finished.
Lists are automatically saved.
Additional VB Options
Edit List: Create, rename, manage, and clear lists.
Quick Show: Use this to quickly show words.
Change List: If you have multiple lists, you can switch between them. In addition, rename, duplicate, merge, and delete lists.
My Lists and Default Lists: In Default lists, find the first 25/50 words, LAMP WFL Transition, and activity-specific lists (such as cars, bubbles etc.).
Merge List: If you have multiple lists, you can combine as many as you want into one list.
Back Up Vocabulary
Insert a USB flash drive into a USB port.
Select Menu > Toolbox > System Settings.
Select Export & Import.
Select Export Vocabulary or Keyboard.
Export your desired vocabulary.
Navigate to your USB flash drive.
Rename the file. Select Save.
Connect to Wi-Fi
Go to Menu > Toolbox > System Settings.
Select Devices & Connections.
Select Choose and then connect to a network.
To return to Empower, select the Empower
 logo that appears in the taskbar.
Software Updates via Wi-Fi
If you see a purple exclamation point (!), it means a software update is available
Go to Menu > Toolbox > System Settings.
Select Updates.
Select Check for Updates next to Update Using Wi-Fi and follow the prompts.
Menu Restrictions
To lock/unlock the Menu button via a password:
Go to Menu > Toolbox > User Settings.
Select Restrictions.
Select Password. Follow the prompts to create a password.
To lock/unlock the Menu button via a USB flash drive:
Note: This option is typically chosen if the end-user gets distracted by a password keyboard.
Go to Menu > Toolbox > User Settings.
Select Restrictions.
Select USB. Insert a USB flash drive and follow the prompts.
This process places an unlock key on the USB flash drive. Anytime this flash drive is plugged into the device, the Menu button will be unlocked.
Remove the USB flash drive and the Menu button will be locked.
Disable the Menu button
Note: If you choose to disable the Menu button, you need to use square button at the bottom edge of the screen to access the Quick Menu/Toolbox.
Go to Menu > Toolbox > User Settings.
Select Restrictions.
Toggle OFF Menu Button.
![]()