![]()
Technical support questions: accentsupport@prc-saltillo.com
This guide applies to NuVoice® software version 2.13 or higher.
Most of the operations in this guide apply to all language systems: Unity®, UNIDAD®, LAMP Words for Life®, CoreScanner™, WordPower®, and Essence®. Exceptions are noted.
Power/Sleep
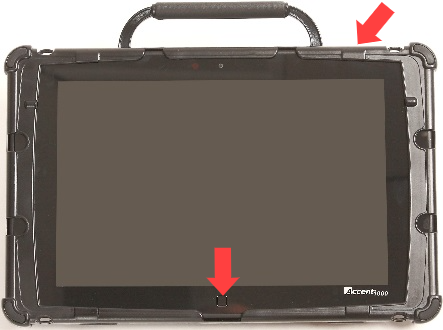
Tools Key
Power/Sleep Button
The power/sleep button is on the top of the device.
To power on the device, press and hold the power/sleep button.
To wake/sleep the device, press the power/sleep button.
The device should be restarted weekly.
Recommended: Restart once per week; put to sleep daily. The device may wake up from sleep if using NuEye® or if Windows® updates are set to install automatically. To preserve the charge overnight, either connect the charger or shut down the device.
To restart, select Tools > Toolbox > Maint Menu > Power Management > Restart, and then select Yes.
If you don’t plan to use the device, want to store it for more than a couple of days, or receive an error message, it is recommended to shut down the device completely. To do this, select Tools > Shutdown, and then select Yes.
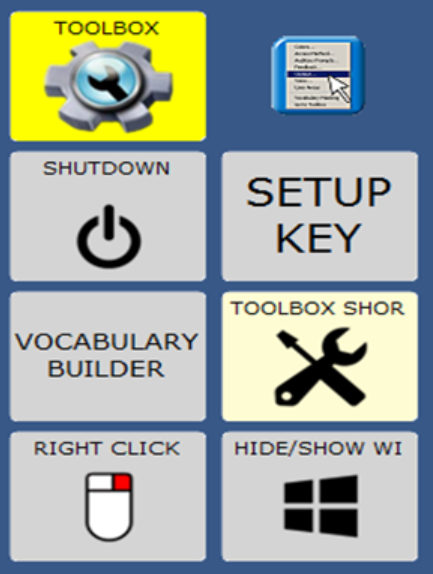
Tools Key
You can select the Tools key using the hardware button near the bottom of the device (shown above), or by selecting the Tools key ![]() on the screen display in the NuVoice software. The Tools key reveals a set of User Keys, such as the Toolbox, Shutdown, and Setup key. The Toolbox and Setup keys are commonly used.
on the screen display in the NuVoice software. The Tools key reveals a set of User Keys, such as the Toolbox, Shutdown, and Setup key. The Toolbox and Setup keys are commonly used.
Switch User Areas
Go to Tools > Toolbox > User Area Menu.
Select Switch User Area.
Select one of the User Areas to switch to. Select OK.
From the toolbox, select Go to Home (blue key).
Note: The Replace User Area setting provides more user area choices and will overwrite an existing user area.
Change the Voice
Go to Tools > Toolbox > Speech Menu.
Select Change Voice.
Select the voice you want to use.
Wait for the voice to load and then listen to the voice by selecting Test Speech.
Adjust the Voice Settings.
Select OK and then select Go to Home.
Pronunciation Dictionary
Go to Tools > Toolbox > Pronunciation Dictionary.
Select either Main Voice or Prompt Voice.
Select Add Pronunciation.
Enter the correct spelling of the word. Select OK.
Enter the phonetic spelling of the word. To test the pronunciation, select the message window. Select OK twice.
From the toolbox, select Go to Home.
Change the Label Size
Go to Tools > Toolbox > Feedback Menu.
Set Label Size to Small, Medium, Large, or Largest.
Select OK and then select Go To Home.
Toolbox Restrictions
There are two ways to restrict access to the toolbox. Either with a password or a USB flash drive.
To restrict the toolbox with a password:
Go to Tools > Toolbox > Maint Menu.
Select Toolbox Restrictions. Set Toolbox Restrictions to ON.
Set Lock Type to Password.
Select Create Toolbox Password. Enter a password, then select OK. Remember your password.
Select OK twice, and then select Go to Home.
To unlock the toolbox with a password:
Select Tools.
Enter your password and select OK.
Select Toolbox.
Select Maint Menu.
Select Toolbox Restrictions and turn Toolbox Restrictions OFF.
Select OK twice, and then select Go to Home.
To restrict the toolbox with a USB flash drive:
Go to Tools > Toolbox > Maint Menu.
Select Toolbox Restrictions. Set Toolbox Restrictions to ON.
Set Lock Type to USB.
Select Create USB Lock Override. Insert a USB flash drive into the device. An override file will be placed on the flash drive. The device will unlock anytime this USB flash drive is inserted into the device. Select OK.
Select OK twice, and then Go to Home.
Remove the USB flash drive.
To unlock the toolbox with a USB flash drive:
Plug the USB flash drive with the override file into the device.
The toolbox will unlock.
Additional options
You can enable/disable the Hardware Volume Button and/or the Tools/Home Key on the device (bottom/middle).
You can enable/disable the Left, Right and/or Bottom Off-screen Keys.
You can enable/disable the On-Screen Tools Key, Help Button, and/or Pulldown Menu Button.
Word Finder
In Unity or LAMP Words for Life, use Word Finder to locate a word in the vocabulary.
From the keyboard:
Select Word Finder.
Enter the word you want to find.
Select OK. One or more matching sequences for the word will be displayed.
Select Show Me or Guide Me.
When you select Show Me, NuVoice steps you through the sequence by highlighting the first key and then advancing to the next key and the remaining keys automatically until reaching the end of the sequence.
When you select Guide Me, NuVoice steps you through the sequence by highlighting the first key in the sequence. When you select the key, NuVoice highlights the next key in the sequence. When you select that key, NuVoice highlights the next key and so forth until reaching the end of the sequence.
If the word is not in Unity or LAMP WFL, it will tell you “no matches found”.
Vocabulary Builder
Vocabulary Builder is a tool that temporarily limits the amount of vocabulary appearing in the vocabulary. For example, you only want 8 words when first introducing the device to a child.
See the video associated with your vocabulary for details on how to use vocabulary builder:
Using vocabulary builder with Unity 1-Hit
Using vocabulary builder with Unity Sequenced
Using vocabulary builder with LAMP Words For Life
Edit a Key
Be sure you are looking at the key you want to edit. Go to Tools > Setup Key.
Touch the key you want to edit.
Select Change Icon. Then do one of the following:
Option A: Spell Icon to Find. Spell what you are looking for. Select OK. Touch the icon you want.
Option B: Take Picture. Frame picture, then select Take Picture. Select Save as Icon. Rename icon. Select OK.
Option C: Import Icon. Plug a USB flash drive with photos on it into the device. Select Import Icon. If the content of the flash drive is showing, touch the photo you want to import. If not, select Up Folder to navigate to the flash drive, and then touch the photo you want. Select OK twice. Select Cancel. The photo will be placed on the key and in the imports folder of the icon dictionary.
Option D: Search for an icon by category.
Confirm the text to speak is correct. If not, select Spell Message or Define Key Function to type text that will appear in the display and be spoken. Type a space after the last character. Select OK.
Check to see if the label is correct. If not, select Change Label, type new label and OK.
Select OK or Choose Next Key to Define.
Take a Photo
Go to Tools > Toolbox > Camera Menu.
Frame the picture. Select Take Picture.
Do either of the following (most common is Option B: Save as Icon):
Option A: Select Save as Scene to use this photo for a visual scene that spans multiple keys. Select Rename Scene, and then select Clear Display. Type a name, select OK twice.
Option B: Select Save as Icon to use this photo for an icon on a single key. Select Rename Icon and then select Clear Display. Type a name and select OK. Select OK again. The photo will automatically be placed in the Imports folder. Note: When changing an icon, your photos will be in the category called Imports.
Select OK and then select Go to Home.
Create a New Activity
This section applies to Unity and Unidad language systems only.
Go to Tools > Toolbox > Create Activity.
Spell the name of the new activity. Select OK.
Select an icon for the activity.
Touch a blank key in the activity. A red box will appear around the key. Edit the key.
When finished, select OK (or touch the next key to be set up). Select Go to Home (blue key).
Hide an Activity
This section applies to Unity and Unidad language systems only.
Go to Tools > Setup Key.
Select the activity you wish to hide.
Select Hide on the right side of this screen.
If you don’t see the activity you need, scroll through by selecting More Items.
When you are finished, select OK.
Create and Link Pages
Be looking at the key that will link to the new page. Go to Tools > Setup Key.
Select the key that will link to the new page.
Select Change Icon to search for an icon.
Select Spell Message or Define Key Function.
Select Clear Display. Select Page Link. Decide if you want your page to automatically close after a key is selected or remain open.
A. Find and select the page you want to link if it is already created.
B. If the page is not already created, select Create New Page, type the name of the page, and select OK. Select Create Page from Template. Select OK.
Select Change Label to change the label. Labels for page links are typically in all CAPS in Unity. Select OK.
Back Up Vocabulary
Insert your flash drive into a USB port.
Go to Tools > Toolbox > Transfer Memory Menu.
Select Save One User Area and then the user area you want to back up or Save Entire Device Contents.
Make sure the pre-set folder is a USB drive. If so, select OK. If not, select Choose different folder and navigate to the USB drive. Then select OK. Type the file name and date (xx-xx-xx).
Select OK and wait for the memory transfer to complete. Select OK twice, and then select Go to Home.
To load a backup file:
Follow steps 1-3 and then choose Load One User Area or Load Entire Device Contents. This process will replace what currently exists in the user area or entire device.
If loading one user area, choose a user area to load into.
Select the backup file on the USB drive.
Wait for the memory transfer to complete. Select OK.
Software Updates with Wi-Fi
Note: Wi-Fi internet updates applies to NuVoice software versions 1.08 and higher only.
To perform this type of update, your device must be connected to a Wi-Fi network. If you have a dedicated device, a Wi-Fi connection will allow you to update your NuVoice software via the Internet, but it will not provide access to the Internet or an Internet browser.
Important: Some updates will take longer than others. We recommend planning downloads for when the device is not needed and you can keep an eye on the download progress.
Verify that you have a wireless connection.
Go to Toolbox > Maint Menu > Software Update Menu.
Select Internet Update.
A message box will inform you that some updates can take a long time and ask if you want to continue. Select Yes (or No to quit).
If there is an update for your device, another message box will ask if you want to download and install it. Select Yes (or No to quit).
Another message box will ask if you want to continue and install the update. Select Yes (or No to quit).
You will see a screen that shows you all the files that will be downloaded. The screen will disappear when the update is finished.
Select OK to exit the Maint Menu.
![]()