![]()
Technical support questions: novachatsupport@prc-saltillo.com
This guide applies to NovaChat® models 8 and 10.
Getting Started
Turn on the device by pressing the power button located at the top or side of the device.
Select Menu ![]() to change the settings or select a Vocabulary File. For more details, see Menus Overview in the Chat Software Manual.
to change the settings or select a Vocabulary File. For more details, see Menus Overview in the Chat Software Manual.
Choose a Voice
Go to Menu > Application Settings > Speech Output > Voice > Voice Settings.
Select the voice list dropdown menu.
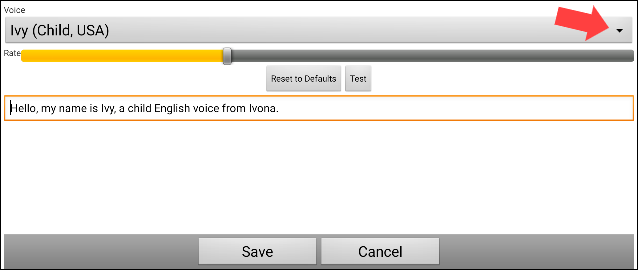
Choose a voice and select Test.
Continue selecting and testing voices until you find the one you want. Then select Save.
Choose a Vocabulary
The device was pre-loaded with more than 20 vocabularies. Typically, the speech and language pathologist (SLP) who completes the evaluation recommends a specific vocabulary. The recommended vocabulary needs to be set up on the device. To do this, choose one of the options below.
Option 1: Contact your SLP or local PRC-Saltillo consultant.
Option 2: Explore the vocabularies on your own:
Go to Menu > Library.
Scroll through the list of vocabularies and tap on one of the files.
Select Open and explore the file.
Repeat until you find the vocabulary you want.
Once you know which vocabulary file to use, the next step is to duplicate the file, which creates a copy that you can customize.
Duplicate a Vocabulary File to Customize
Go to Menu > Library.
Select the vocabulary file to copy.
Select Duplicate.
Type a name for the file and select Save.
The new file should open automatically; it is ready to customize in Edit Mode.
Customize a Vocabulary
It is important to customize the vocabulary for the person who will use the device. To start, you might add buttons to the About Me page (often located under Social or Chat) to include important people, favorite things (food, drink, leisure items), or you can import personal information.
Activate Edit Mode
To edit a vocabulary file or any resource linked to it (pages, buttons, etc.), you must first activate Edit Mode by going to Menu > Edit Mode.
While in Edit Mode, all buttons are outlined, and the words “Edit Mode,” followed by the current vocabulary and page names, appear in red across the bottom row of buttons.
Customize a Button
Go to Menu > Edit Mode.
Press and hold on the button you want to edit (right-click if you are using ChatEditor™).
Select Edit Button.
Change the Button Label or message: Tap in the Label or Message box to display the keyboard and enter text in the box.
Change the button image: Choose Find (on the device) or Search or Browse (in ChatEditor).
Find opens a list of categories. Choose a category to open a list of images. Then select the image you want. The image will be displayed in the Button Properties.
Search allows you to search for icons with the label name. If you don’t find an appropriate image, enter a new item in the text box, select Search, and choose a different image.
Browse allows you to browse for images. Select a category to view the images in that category. Choose the image you want.
Select Save.
Copy and Paste a Button
Buttons can be copied and pasted to new locations. If you modify a copy of a button, you will edit only the copy.
Press and hold on the button you want to copy.
Select Copy.
Press and hold on the new location.
Select Paste.
Change the Colors on a Button
Go to Menu > Edit Mode.
Press and hold on the button to modify (right-click if you are using ChatEditor).
Select Edit Button.
Select the Style tab.
To change the background color, select Body and choose a color.
To change the outline color, select Border and choose a color.
Note: Adding a different color border may act as a visual prompt for the user.
When you finish making changes, select Save.
Hide Buttons
Go to Menu > Edit Mode > Menu > Hide Mode.
Select the buttons to hide. They will turn gray.
Select Menu > Hide Mode to exit Hide Mode.
Select Menu > Edit Mode to exit Edit Mode and hide the buttons.
Note: To redisplay the buttons, go to Menu > Edit Mode > Menu > Hide Mode and select the gray buttons to redisplay them. Then go to Menu > Hide Mode > Menu > Edit Mode to exit.
Using Word Finder to Search for a Word
Word Finder does not find the path to buttons containing phrases—only to buttons containing single words. Follow the steps below to find where a word is in a vocabulary.
Do one of the following to open Word Finder.
Select Word Finder from the Menu to open a keyboard.
Select a button with the Word Finder button action (if you created one) to open a keyboard. See Create a Find Word Button Action in the Chat Software Manual for instructions.
Type the word in the colored box. Uses of the word will appear above the colored box and one or more paths to the word will appear below the colored box.

Select Next (or Done) to close the keyboard.
Select Guide Me to the right of the pathway to the word.
Guide Me will show you the path to the word.
Using Word Finder with a Keyguard or TouchGuide Attached
If a keyguard or TouchGuide is attached to the device, you can open Word Finder from a keyboard page without having to remove the keyguard or TouchGuide to access Word Finder from the Menu.
With the keyguard or TouchGuide attached as usual, open a keyboard page in the vocabulary (for example, select the Spell/Num button or the ABC 123 button).
Type the word you want to search for.
Select the Word Finder button.
Note: If the word does not exist in the vocabulary, nothing will happen when you select the Word Finder button.
Guide Me will show you the path to the word.
Change the Pronunciation of a Word
Go to Menu > Application Settings > Speech Output > Voice > Pronunciations.
Select Menu > New.
Type the word in the Pronounce box and select Next.
Type the word’s phonetic spelling (how it sounds) in the Pronounce As box.
Test the word by selecting Pronounce It.
Once the word is pronounced properly, select Done, and then select Save.
Note: To edit or delete a word in the pronunciation dictionary, press and hold on the word entry and select the appropriate option.
Transfer Customized Files using a USB Flash Drive
One end of the USB flash drive provided with your device plugs into the device and the other end plugs into a computer.
Connect the USB drive to the USB port on your device.
Note: If the device’s file manager opens, use the device’s Back arrow
 to close it.
On the device, go to Menu > Library > Menu > Import/Export.
Note: A different file management screen may open. Depending on your device, select or navigate to the USB drive, choose the folder you want, and choose Select or OK.
A window will list the customized vocabulary files under Device on the left. Any files already on the USB drive are listed under Backup Folder on the right.
To transfer files from your device to the USB drive:
Select each file on the device that you want to copy to the USB drive.
Select To Backup, which is now highlighted. The file(s) will be copied to the USB drive. When the files finish copying, they will be listed under Backup Folder.
To transfer files from the USB drive to your device:
Select each file on the USB drive that you want to copy to the device.
Select To Device, which is now highlighted. The file(s) will be copied to the device. When the files finish copying, they will be listed under Device.
When you finish transferring files, disconnect the USB drive from your device and store it in a safe location and/or copy the files from the USB drive to a computer.
Transfer Customized Files between the Device and ChatEditor
ChatEditor is a supplemental editing program that allows you to customize the vocabulary when the device is not present.
Download ChatEditor onto your computer from this website: prc-saltillo.com/software-downloads.
Open ChatEditor on your computer.
Connect a USB cable to the device and the computer. The device screen will display “Transfer Mode”.
In ChatEditor, select Library and then select Transfer.
Select Vocabs to/from Device.
From the Transfer screen, copy customized vocabulary files from the device to ChatEditor or from ChatEditor to the device.
Backup/Restore Vocabulary with Settings
You can back up and restore a vocabulary with Profiles and User Settings, including pronunciation exceptions, abbreviations, and learned Word Predictions.
To get started, go to Menu > Application Settings > System > User Backup/Restore. The User Backup/Restore menu will open. Insert the USB flash drive into your device’s USB port. Note: If the device’s file manager opens, use the device’s Back arrow ![]() to close it.
to close it.
Backing up User Data on a Device
From the User Backup/Restore menu, select User Backup. A keyboard page will open with a default name for the backup.
Change the name as needed.
Select Save from the keyboard page. The Android File Manager will open.
Click on the icon in the upper left corner. Be sure that the USB drive is selected.
A backup screen will show the backup file name and “Save”. Select Save.
When the message “The backup completed successfully” appears, select OK to close the message and remove the USB drive from the device.
Restoring User Data to a Device
Important: User Restore will overwrite existing user data on the device.
From the User Backup/Restore menu, select User Restore. Select the USB drive if it isn’t already selected.
Select the user backup file and select Save.
Select Yes to complete the process.
Related Resources
![]()